Pay in installments of $5.60 with
 ,
,
 and
and

Shipping Estimate
USA
- USA
- CAN
- USA
- CAN
Ships within 48 hours · Estimated delivery Sep 8 - Sep 13
 Promo Codes Available:
For Your Every Summer RSVP, with Code: SUMMER15
Description
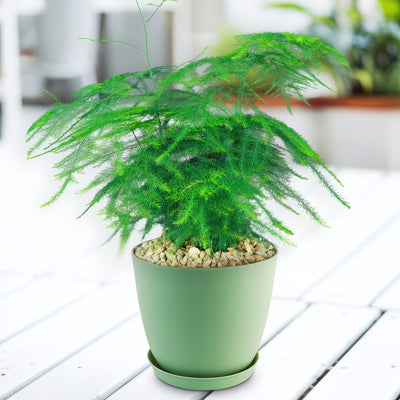
asparagus plant indoor Asparagus Fern PlantsThe Asparagus Ferns plants or Pulmosa fern, known as Asparagus setaceus, is a delicate, airy plant celebrated for its feathery, fern like foliage that brings an elegant touch to indoor and outdoor spaces. Despite its common name, it is not a true fern but a member of the asparagus family. Its versatility makes it suitable for hanging baskets, ground covers, or as part of mixed container plantings. Its ability to climb or trail further enhances its
The Asparagus Ferns plants or Pulmosa fern, known as Asparagus setaceus, is a delicate, airy plant celebrated for its feathery, fern-like foliage that brings an elegant touch to indoor and outdoor spaces. Despite its common name, it is not a true fern but a member of the asparagus family. Its versatility makes it suitable for hanging baskets, ground covers, or as part of mixed container plantings. Its ability to climb or trail further enhances its appeal, allowing for creative landscaping and interior decorating options.
This plant is widely recognized by several common names, including common asparagus fern, Lace Fern, Climbing Asparagus, and Asparagus pulmosus. These names reflect its graceful appearance and growth habits. Each name highlights a unique characteristic, such as its lacy foliage or climbing tendencies.
The Asparagus Fern plant is native to the warm regions of southern and eastern Africa.
In its native habitat, it thrives in tropical and subtropical environments, often growing as an understory plant in forests.
Its adaptability to different light and soil conditions has allowed it to become a popular ornamental plant worldwide.
The Plumosa Fern has fine, feathery foliage that resembles soft green plumes. These “leaves” are actually modified stems called cladodes, which give the plant its fern-like appearance.
Its wiry, trailing stems make it an excellent choice for hanging baskets, while its climbing tendencies allow it to adorn trellises or other supports when grown outdoors. The plant’s vibrant green color is another highlight, adding freshness to any space.
The Asparagus Fern plant has a versatile growth habit, adapting to different planting conditions. When grown indoors as a houseplant, it typically reaches a height of 2 feet with a spread of 3 feet, making it manageable for smaller spaces. Outdoors, in ideal conditions, can grow significantly larger, with stems trailing up to 6 to 10 feet long. Its climbing ability allows it to scale structures or cascade beautifully over containers.
The flowers of Asparagus Ferns plants are small, inconspicuous white or pale green that bloom in summer. These blooms appear sporadically in clusters. If pollinated, the flowers give way to small, round berries that start green and ripen to a vibrant red. These berries add a pop of color and visual interest to the plant.
The Plumosa Fern offers several benefits beyond its ornamental value. It is an excellent air purifier, helping to improve indoor air quality by filtering out toxins. Its lush foliage provides a calming and soothing aesthetic, often used in floral arrangements and as a backdrop for other plants. Additionally, it is relatively easy to care for, making it a perfect choice for novice gardeners or those looking for a low-maintenance addition to their plant collection.
When and How to Water Your Asparagus Fern
The Asparagus fern is highly drought-tolerant, making it an excellent choice for those who may occasionally miss watering. While it can withstand extended dry periods, its lush, feathery foliage flourishes with consistent but moderate moisture. Overwatering remains the most common mistake, so it’s crucial to maintain a balance that keeps the soil lightly moist without becoming soggy.
From the Spring through Fall, during the growing season, this fern plant actively grows and requires more frequent watering. Check the soil weekly and water when the top inch feels dry to the touch. Depending on the indoor environment, this may translate to watering every 5–7 days. Always use a pot with drainage holes to prevent root rot and remove excess water from the saucer after watering.
In the winter, during the dormant season, the Asparagus fern's water requirements decrease. Water less frequently, roughly every 10–14 days, and ensure the soil has time to dry out slightly between waterings. This mimics the plant’s natural cycle and prevents waterlogging during periods of reduced growth.
Light Requirements – Where to Place Your Pulmosa Fern
When growing your Asparagus fern indoors, prefers bright, indirect light. Place it near an east- or north-facing window where it will receive filtered sunlight for 4–6 hours daily.
Avoid direct sunlight, which can scorch its delicate foliage, but ensure it has enough light to maintain its vibrant green color. If natural light is insufficient, supplemental grow lights can help.
For outdoor cultivation, the Plumosa fern flourishes in partial to full shade. It enjoys 2–4 hours of dappled sunlight, ideally during the morning or late afternoon when the sun is less intense.
A spot under a tree canopy or shaded patio is ideal, as it protects the plant from harsh midday rays.
Ensure its outdoor placement mirrors its natural habitat, with adequate moisture and indirect light.
Optimal Soil & Fertilizer Needs
Asparagus fern plants thrive in light, well-draining soil rich in organic matter. A mix of standard potting soil, perlite, and compost provides the perfect balance of drainage and nutrients. Avoid heavy, clay-based soils, which retain excess moisture and may lead to root rot. For outdoor plantings, amending garden soil with compost ensures adequate drainage and fertility. Planet Desert has specialized potting soil, opens in a new tabGo to soil cactus mix blend 1 gal 4 qt cacti succulent dirt compost growing media that includes an organic substrate with mycorrhizae to help with the growth of a healthy root system to help your fern thrive.
Fertilize your fern once a year in the spring during its active growing season for lush, vigorous growth. Use a balanced liquid NPK fertilizer with a ratio of 5-10-5. Slow-release granular fertilizers are another option, providing steady nutrition over time. During the dormant season, reduce or cease fertilizing, as the plant’s growth slows and its nutrient needs decrease.
Hardiness Zones & More
When grown indoors, Asparagus fern prefers bright, indirect light with temperatures between 60–75°F. It struggles in drafts or extreme temperature fluctuations, so avoid placing it near windows or doors that experience frequent cold drafts. While it appreciates moderate humidity, it can adapt to typical indoor levels, though occasional misting or a humidifier can help maintain its lush foliage in drier climates.
For outdoor cultivation, Asparagus fern is hardy in USDA Zones 9–11, where it can withstand temperatures as low as 20°F. It thrives in filtered light or partial shade, mimicking the dappled sunlight of its natural forest habitat.
In cooler zones, the plant should be brought indoors or treated as an annual. Outdoor humidity benefits its growth, but if the climate is dry, occasional misting or grouping with other plants can provide extra moisture.
Wildlife – Asparagus Fern Attracts the Following Friendly Pollinators
Asparagus fern’s small, inconspicuous flowers attract pollinators such as bees, butterflies, and hummingbirds. These pollinators are essential for the reproduction of the plant, as they help transfer pollen between flowers.
According to the ASPCA, Asparagus fern is mildly toxic to cats and dogs if ingested in large quantities. It can cause gastrointestinal upset, vomiting, and diarrhea. So, keep this plant out of reach of pets to prevent accidental ingestion.
How to Propagate Your Asparagus Fern
To propagate your asparagus fern plant, you can do so by division or by planting the plantlets that grow on the mother plant. To divide the plant, carefully remove it from its pot and gently separate the roots into smaller sections, making sure each section has some healthy roots attached. Replant these divisions in fresh soil and water thoroughly to help them establish.
Alternatively, you can propagate your asparagus fern by planting the plantlets that grow on the mother plant. These small plantlets can be carefully removed and planted in their own pots with fresh soil. Keep the new plants well-watered and in a warm, humid environment to encourage growth and development.
Key Takeaways
- This drought-tolerant Asparagus Fern can withstand occasional dry spells due to its robust root system, making it a low-maintenance plant for those who may forget to water regularly.
- Despite its name, the Plumosa Fern is not a true fern but a member of the Asparagus family. Its delicate, fern-like appearance comes from its soft, feathery cladodes, which are modified stems.
- The plant’s feathery fern-like, flexible stems allow it to climb supports like trellises or cascade beautifully from hanging baskets, making it a multi-functional addition to gardens and homes.
- This plant contributes to better indoor air quality by filtering out toxins, making it both a decorative and health-enhancing choice for indoor spaces.
- When grown in optimal conditions, the Asparagus Fern produces small, white flowers that develop into vibrant red berries, adding an unexpected pop of color to its lush greenery.
The Bottom Line
Overall, the Asparagus Fern (Asparagus setaceus) is a versatile, eye-catching plant known for its soft, feathery, fern-like foliage, which adds a touch of elegance to any indoor or outdoor space. Despite its delicate appearance, it is a hardy plant that thrives in a variety of conditions. Its wiry stems can trail gracefully from hanging baskets or climb supports, making it an excellent choice for creative displays. This plant prefers bright, indirect light but can tolerate some shade, and it benefits from regular watering, allowing the top inch of soil to dry out between waterings to prevent root rot. Although drought-tolerant to some extent, it thrives in higher humidity, making occasional misting beneficial. The Asparagus Fern is also easy to care for, requiring well-draining soil and a balanced fertilizer during its growing season to maintain its lush, vibrant foliage.
Shipping Notes
- Free Standard Shipping on $100+ Orders to the USA.
- Except Preorder products are shipped in 48 hours.
- Delivery to the USA:
- Standard Shipping : 3-10 business days
- If time is of the essence, please consider selecting expedited delivery for faster service.
Exchange/Return Notes
- We offer a 30-day return/exchange service after receiving.
- Final sale items are not eligible for returns or exchanges.
- To process your return/exchange, please contact us at [email protected]
- Please click here for more details>>> Return & Exchange Policy