Pay in installments of $5.27 with
 ,
,
 and
and

Shipping Estimate
USA
- USA
- CAN
- USA
- CAN
Ships within 48 hours · Estimated delivery Sep 10 - Sep 15
 Promo Codes Available:
For Your Every Summer RSVP, with Code: SUMMER15
Description
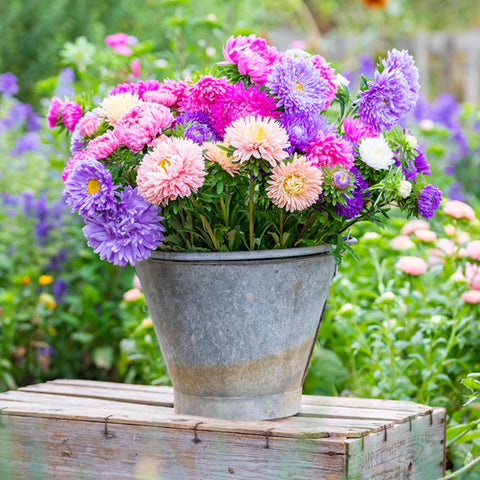
planting china aster seeds 20s | Aster Seeds (Dwarf) - Colour Carpet Mix Aster Seeds1 Pack 20 seeds Step by Step Guide 1. Seed Preparation Cold Stratification (Recommended): While not always necessary, cold stratification can improve germination rates for Aster dumosus seeds. To cold stratify: Mix the seeds with moist sand or a moistened paper towel. Place them in a sealed plastic bag. Refrigerate for 4 6 weeks before sowing. This process mimics the natural winter conditions that seeds experience before sprouting in spring. 2. Sowing
1 Pack - 20 seeds
Step-by-Step Guide
1. Seed Preparation
Cold Stratification (Recommended): While not always necessary, cold stratification can improve germination rates for Aster dumosus seeds. To cold stratify:
Mix the seeds with moist sand or a moistened paper towel.
Place them in a sealed plastic bag.
Refrigerate for 4-6 weeks before sowing. This process mimics the natural winter conditions that seeds experience before sprouting in spring.
2. Sowing Seeds
Indoor Sowing
Timing: Start seeds indoors 6-8 weeks before the last expected frost. This gives the seedlings a head start and ensures they are ready for transplanting outdoors.
Containers: Use seed trays or small pots with drainage holes to prevent waterlogging.
Soil: Use a well-draining seed starting mix. Asters prefer a light, airy mix that prevents waterlogging.
Planting Depth: Sow the seeds on the surface of the soil and press them gently into the soil. Cover lightly with a thin layer of soil or vermiculite, about 1/8 inch deep.
Watering: Moisten the soil with a spray bottle to keep it consistently moist but not waterlogged.
Outdoor Sowing
Timing: Sow seeds directly outdoors in early spring or late fall. Fall sowing allows seeds to naturally stratify over winter.
Location: Choose a spot with full sun to partial shade and well-draining soil.
Planting Depth: Scatter the seeds on the soil surface and cover lightly with soil, about 1/8 inch deep. Press the soil gently to ensure good seed-to-soil contact.
Watering: Water gently to keep the soil moist until seeds germinate.
3. Germination Conditions
Temperature: Maintain a soil temperature of 65-75°F (18-24°C). Using a heat mat can help maintain consistent temperatures for indoor sowing.
Light: Provide bright, indirect light. Place indoor seed trays near a sunny window or under grow lights for at least 6-8 hours a day.
Moisture: Keep the soil consistently moist but not waterlogged. Mist the soil surface with water if it starts to dry out. Covering the trays with clear plastic can help retain moisture and warmth, but remove the cover once seedlings emerge to prevent mold.
4. Germination Time
Expect germination in about 14-21 days under optimal conditions.
5. Seedling Care
Thinning: Once the seedlings are a few inches tall and have developed their first true leaves, thin them out to prevent overcrowding. Space them about 12-18 inches apart to ensure they have room to grow and good air circulation.
Light: Ensure seedlings receive plenty of light. If growing indoors, place them in a sunny window or under grow lights for at least 6-8 hours a day.
Watering: Continue to keep the soil moist but not soggy. Water gently to avoid displacing the seedlings.
6. Transplanting
Hardening Off
Timing: Begin hardening off seedlings about a week before transplanting them outdoors. This helps them acclimate to the outdoor environment and reduces transplant shock.
Method: Gradually expose the seedlings to outdoor conditions, starting with a few hours of sunlight per day and increasing the duration over several days.
Outdoor Planting
Timing: Transplant seedlings outdoors after the last frost date and when they are sturdy enough to handle.
Location: Choose a sunny spot with well-draining soil. Bushy Asters thrive in full sun but can tolerate partial shade.
Spacing: Space the plants 12-18 inches apart to allow for growth and airflow. This helps prevent disease and promotes healthy growth.
7. Ongoing Care
Watering: Water regularly to keep the soil moist, especially during dry spells. Asters prefer consistent moisture but do not like to be waterlogged. Water at the base of the plant to avoid wetting the foliage.
Mulching: Apply a thin layer of mulch around the plants to help retain moisture and suppress weeds. This also helps maintain an even soil temperature.
Fertilizing: Apply a balanced, slow-release fertilizer once in the spring. Avoid over-fertilizing, which can lead to lush foliage with fewer flowers.
Pruning: Pinch back the growing tips in early summer to encourage bushier growth and more blooms. Remove spent flowers to promote continuous blooming and prevent the plant from putting energy into seed production.
8. Pest and Disease Management
Monitoring: Watch for common pests such as aphids, spider mites, and leafhoppers. If necessary, treat with insecticidal soap or neem oil.
Disease Prevention: Ensure good air circulation around the plants to prevent fungal diseases. Avoid overhead watering to reduce the risk of leaf spot, mildew, and rot.
Deadheading: Regularly remove spent flowers to encourage continuous blooming and prevent the spread of disease.
Summary of Growing Duration
From Sowing to Germination: Approximately 14-21 days.
From Planting to Flowering: Bushy Asters typically bloom in late summer to fall, about 10-12 weeks after planting.
Full Bloom: Flowers last for several weeks, providing vibrant color in the garden until frost.
Additional Tips
Soil Preference: Bushy Asters thrive in well-drained, loamy soil but can adapt to various soil types as long as they are not waterlogged.
Sunlight: Provide full sun for the best growth and flowering. Asters can tolerate partial shade but may produce fewer flowers.
Support: Due to their compact growth habit, Bushy Asters typically do not require staking, making them easy to maintain.
Propagation: Besides growing from seeds, asters can also be propagated by dividing mature plants in the spring or fall.
SHIPPING
?Flat Rate delivery no matter how many seeds you order;
? Growing instructions included on each seed packet;
? FREE SHIPPING on all orders of $30 or more
.
? Please note that we cannot guarantee the success of seeds or plants because these aspects
depend on the environment in which they are cultivated.
Shipping Notes
- Free Standard Shipping on $100+ Orders to the USA.
- Except Preorder products are shipped in 48 hours.
- Delivery to the USA:
- Standard Shipping : 3-10 business days
- If time is of the essence, please consider selecting expedited delivery for faster service.
Exchange/Return Notes
- We offer a 30-day return/exchange service after receiving.
- Final sale items are not eligible for returns or exchanges.
- To process your return/exchange, please contact us at [email protected]
- Please click here for more details>>> Return & Exchange Policy