SKU: 25121610577
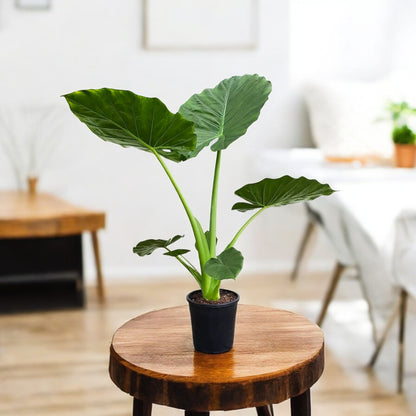
elephant ears plant indoor

elephant ears plant indoor Buy Alocasia Green Plant

Sale price$25.36 Regular price$28.18
Save 10%

Pay in installments of $7.04 with ShopPay, AfterPay and Klarna

Shipping Estimate
USA
  • USA
  • CAN

Ships within 48 hours · Estimated delivery Sep 11 - Sep 16

Promo Codes Available:

For Your Every Summer RSVP, with Code: SUMMER15

Description

elephant ears plant indoor Buy Alocasia Green PlantAlocasia Plant Alocasia (Alocasia spp.) produces large leaves that earn some varieties the common name elephant ear. The tropical looking plants feature variegated leaves and they quickly spread and cover bare, shady areas in the summer garden. Alocasia grows as a perennial in U. S. Department of Agriculture plant hardiness zones 8 through 11, depending on the specific variety. With proper planting and care, the plant can survive winter and provide

Alocasia Plant

Alocasia (Alocasia spp.) produces large leaves that earn some varieties the common name elephant ear. The tropical-looking plants feature variegated leaves and they quickly spread and cover bare, shady areas in the summer garden. Alocasia grows as a perennial in U.S. Department of Agriculture plant hardiness zones 8 through 11, depending on the specific variety. With proper planting and care, the plant can survive winter and provide summer greenery for years.

Alocasia growth can be broken out into two catagories one catagory of Alocasia prefer moist soil (the green leaf types) and the other prefers very well drained soil on the drier side. (Amozonica) Alocasia is commonly referred to as Elephant Ear, the huge green to deep purple leaves bear a likeness to the ears of an elephant. Alocasia will adjust its size according to the amount of sun it receives. The more sun it receives the smaller it will be, the less sun it recieves the larger it will become "to a point". In some cultivars the difference can be staggering. The green leaf cultivars such as Calidora and California love water these types will grow well along side a pond or lake. Other cultivars prefer drier soil and if kept moist will develope crown rot these varieties are Longiloba, Amazonica and other like kinds. When growing the green type in the home landscape we recommend morning sun and afternoon shade in an area with an ample water supply.

This will produce huge, broad leaves in Alocasia Calidora. We recommend a soil rich in organic fertilizer with composted manure. Compost should be worked into the soil at a ratio of 1/40 lb bag per 16 sq. ft. this ratio will produce the best results. A slow release 12 month balanced fertilizer applied in the spring will provide nutrients throughout the growing season. When fall arrives the plants should be allowed to die back by restricting water or the onset of frost at this point the bulbs can be brought in for the winter in zones 7 or above or left in ground in zones 8 and higher. Most Alocasia prefer high humidity and grow larger faster in humid conditions. Alocasia can also be grown as a terrarium plant and tend to thrive in the humid conditions. Amazonica does well in moderate humidity and when placed in the controlled eviroment of a terrarium the results can be spectacular thus giving virtually anyone the ability to tend a piece of the tropics. Alocasia flowers are borne readily in upright clusters throught the growing season as a spath type flower and have a mild to fragrent smell depending on the species. I recommend trying Alocasia Calidora for first time growers but remember to leave room in your garden because you will have to have more.

Site and Soil
Alocasia tolerates both sun and shade, but it performs best when planted in partially shaded garden beds. A site with full morning sunlight but afternoon shade provides a better location than a bed that receives sunlight all day. Alocasia also require soil that remains moist and doesn't dry out completely. Working 2 to 4 inches of compost into the site before you plant helps the soil retain moisture while also supplying organic matter. Avoid sandy soil that drains and dries quickly.

Planting
The rhizomes, or tuberous roots, require frost-free weather to grow and avoid cold damage, so they are usually planted in spring after frost danger passes. You can also start them indoors six weeks earlier in pots, then transplant the actively growing plants outdoors after frost. Plant tubers 2 to 3 inches deep in the prepared planting site or pot. The proper spacing depends on the alocasia variety, but generally the plants require between 3 and 5 feet of space to spread their large leaves.

Basic Care
The primary care consideration is water. Depending on weather conditions, alocasia can require frequent irrigation. Water when the top 1/2 inch of soil begins to dry. Growing in shade and mulching the bed prevents the soil from drying too quickly, but the plants might still require two or more waterings a week during dry weather. Alocasia benefits from slow-release fertilizer applied every two months during the growing season. Use a fertilizer formulated for foliage plants and apply it at the package-recommended rate. Spider mites might infest the leaves. Rinse the pests off the foliage with a sharp spray of water, or treat with a miticide applied according to package directions.

Winter Tips
The cold hardiness of alocasia varies depending on the variety, but most can't tolerate frost. The foliage usually dies back and can be removed in fall. In mild climates that rarely experience prolonged frosts, covering the roots with 2 to 3 inches of mulch usually provides enough insulation for winter protection. Less hardy alocasia varieties, or those grown in cooler areas, must be dug up and overwintered indoors. Store the tubers in dry peat moss in a cool basement or garage, where temperatures remain above freezing, until you replant in spring.

Shipping Notes
  • Free Standard Shipping on $100+ Orders to the USA.
  • Except Preorder products are shipped in 48 hours.
  • Delivery to the USA:
  1. Standard Shipping : 3-10 business days
  • If time is of the essence, please consider selecting expedited delivery for faster service.
Exchange/Return Notes
  • We offer a 30-day return/exchange service after receiving.
  • Final sale items are not eligible for returns or exchanges.
  • To process your return/exchange, please contact us at [email protected]
  • Please click here for more details>>> Return & Exchange Policy
SKU: 25121610577

Discover Niche Categories That Outsell elephant ears plant indoor

Top-Converting Item to Boost Your Average Order

4.5 ★★★★★
Based on 18 reviews
Sort
Highest Rating
Newest First
Oldest First
Product Reviews
S
Verified Purchase
Skylar Hartnett
Carnegie, US
★★★★★ 5
It works to divide a room, but it's not easy to use.
Color: Grey, Size: 6 Panel
This comes in multiple pieces and you have to build every single piece including the cloth that is between the two poles. There are plastic clips to hold the sections together, but they easily come off if you move the dividers the wrong way or try to reposition it. The only thing holding it up is rectangular shaped feet on the bottom and they are a pain when you hit it with your toes. It works if you need to divide a room, but its not pretty and there are far better options. It's cheaply made and has a habit of falling down if you are trying to use it in a straight or slightly angled line.
WAS THIS REVIEW HELPFUL?YesReportShare
Reviewed in the United States on December 26, 2022
A
Verified Purchase
Amazon Customer swengelp
Omaha, US
★★★★★ 4
Nice divider
Color: Black, Size: 6 Panel
Nice divider. Set up is a bear. I am a bit concerned with stability. Overall I like it.
WAS THIS REVIEW HELPFUL?YesReportShare
Reviewed in the United States on March 12, 2026
N
Verified Purchase
Nay from the Bay
Massapequa, US
★★★★★ 5
Great privacy room divider
Color: Black, Size: 6 Panel, Color: Black, Size: 6 Panel
I got this room divider for our game room that shares the garage/laundry room, to separate the spaces. I was happy that it was relatively easy to put together in less than an hour with nothing more than a screwdriver (provided) although I used a small handheld drill. The instructions were pretty straightforward and easy to understand as everything was labeled. I have 2 small grandkids at home running around while I put this together so my timeline to completion might be longer than others. It recommends 2 people to assemble, but I was able to complete alone in about 40 minutes total and as I said I used a small handheld drill, (although it does come with a small Philips screwdriver) which is the only tool you need for assembly. The first two panels took me about 20 minutes but the other 4 were simple repeats after the initial 2. After all 6 panels were assembled the plastic clips to piece them together were literally a "SNAP" to put on. The poles are made of metal and the panels are made of a very sturdy almost canvas like fabric. When held up to the light not a lot shined through so very good for privacy. You can snap them together in sections and have 2 separate panels of 3 or what ever configuration you want. They are easy to move and bend around furniture or other obstacles, also fold flat together if you need to put them aside for storage. This worked out just as we had planned, very easy to move around when needed and I am very happy with this product. I loved how simple it was to put together, easy instructions, and the durability and functionality of it.
WAS THIS REVIEW HELPFUL?YesReportShare
Reviewed in the United States on December 29, 2024
R
Verified Purchase
robert ferrell
Natrona Heights, US
★★★★★ 5
Good
Color: Black, Size: 6 Panel
Love it , just what so needed , easy to put together (some what ) …
WAS THIS REVIEW HELPFUL?YesReportShare
Reviewed in the United States on May 16, 2026
C
Verified Purchase
Crimm
Massapequa, US
★★★★★ 3
Decent for the price. Instructions suck but most people should be able to figure it out. More below.
Color: Black, Size: 6 Panel, Color: Black, Size: 6 Panel
SUMMARY: 3 stars from me because it's firmly average. It's fine for the price. Assembly and materials are alright but I can see some caveats depending on your circumstances. Assembly instructions do a subpar job of pointing out some details. ASSEMBLY INSTRUCTIONS: Maybe it's because I'm autistic and/or building model kits and assembling stuff is my jam, but I honestly thought people were exaggerating when they were complaining about the instructions and I'd be able to flex my ~superior assembly skills.~ I was wrong! These instructions genuinely suck, and whoever is responsible for making them should be ashamed. The instructions do a poor job of calling out some details regarding orientation of parts, and some of the images do not actually match the physical parts. For example, it does not really outline the assembly of the end panels clearly, and I can see someone accidentally using the wrong poles. I've drawn over a photo to show what you should do to try and make it clearer. Additionally, the manual shows a flathead screw for bolting the feet into position, but the actual screw is not a flathead. It also does not point out the counterbore, so if you aren't paying attention you may put the foot pads onto the wrong side of the foot. It's also missing the fact that you need to use another one of the plastic pieces when you finish assembling a panel. ACTUAL ASSEMBLY & MATERIALS: To their credit, all of my bags were clearly labeled. The assembly process wasn't difficult. It's mostly just tedious and requires a fair amount of space. I was able to assemble it by myself without any real difficulty. However, the way it's assembled means two things. One, the fabric parts aren't removable without disassembly. So if you want to use this in an environment where they would require cleaning, I would seriously recommend looking for another option. Or, you could buy this just to use the frame pieces and then somehow buy or make your own fabric pieces designed to be removable with velcro or something. Two, because of the materials I really don't have a lot of faith in this thing surviving disassembly and reassembly. Like a lot of sorta-cheap-but-convenient furniture, it uses those spring-button connections and plastic inserts with self-tapping screws. Those things are not really meant to be disassembled and rethreaded. It also relies a lot on the tension of the poles and the fabric to keep everything rigid and squared, which I think puts a lot of pressure on the aforementioned buttons, plastic inserts, and the hollow metal rods. So I feel like that will also cause issues with disassembly and reassembly. Basically once this thing is assembled, it's not really meant to be disassembled. The best you can do is spot-clean the fabric if you need to. Speaking of the fabric, I didn't see any labels on them or anything in the manual that says what they are, but they feel like some kind of polyester. They generate static electricity pretty easily, and pet hair and debris sticks easily. So that's another downside of them not being easily removable. For the most part it does seem pretty stable. The poles seem to be pretty uniform in length so they're all making contact with my floor. Obviously this isn't structural so it shouldn't be supporting anything, but the two main feet seem to be doing fine with keeping this thing upright. CLOSING THOUGHTS: Really, it's fine for what it is, but it could be better in a lot of little ways and the substandard quality of the instructions just seems unprofessional to me, which is why I'm being so harsh with my rating. Depending on your needs and environment you may want to consider a different option. Preferably one that is made to be disassembled with better materials, and/or one with fabric pieces made to be removed easily.
WAS THIS REVIEW HELPFUL?YesReportShare
Reviewed in the United States on May 28, 2023

recommand products