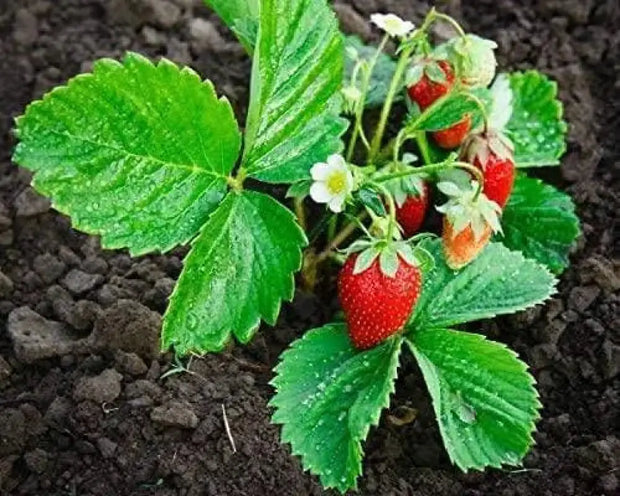
SKU: 44824340418
organic strawberry seeds for sale

organic strawberry seeds for sale 2 pack x 1200 seeds Organic Strawberry Seeds for Year-Round Planting

Sale price$26.25 Regular price$29.17
Save 10%

Shipping Estimate
USA
  • USA
  • CAN

Ships within 48 hours · Estimated delivery Jul 13 - Jul 18

Promo Codes Available:

For Your Every Summer RSVP, with Code: SUMMER15

Description

organic strawberry seeds for sale 2 pack x 1200 seeds Organic Strawberry Seeds for Year-Round PlantingTL; DR (AI Summary) 2400 organic strawberry seeds (Fragaria vesca & everbearing) for year round container gardening; ideal for small spaces like balconies and patios, with berries ready in 6090 days. Best for: Urban balcony gardeners Best for: Families with kids Best for: Home cooks wanting fresh berries Best for: Container and hanging basket growers Not suitable for: Large scale commercial farming Not suitable for: Indoor only growing without

TL;DR (AI Summary)

2400 organic strawberry seeds (Fragaria vesca & everbearing) for year-round container gardening; ideal for small spaces like balconies and patios, with berries ready in 60–90 days.

  • Best for: Urban balcony gardeners
  • Best for: Families with kids
  • Best for: Home cooks wanting fresh berries
  • Best for: Container and hanging basket growers
  • Not suitable for: Large-scale commercial farming
  • Not suitable for: Indoor-only growing without sufficient light
  • Not suitable for: Immediate harvest (requires 60–90 days)

Key Features:

  • Seed Count: 2400 seeds (2 packs of 1200)
  • Variety: Organic Fragaria vesca & everbearing types
  • Growing Locations: Hanging baskets, containers, patios, balconies
  • Time To Harvest: 60–90 days from sowing
  • Climate Adaptability: Perennial in cooler zones; everbearing annual in warm climates


Grow Your Own Strawberry Seeds (Fragaria vesca & everbearing varieties) – Sweet, Fragrant Homegrown Berries for Hanging Baskets, Container Patios & Urban Balcony Gardens Nationwide

Strawberry seeds (especially alpine and everbearing types like Fragaria vesca) let you grow true-to-type, intensely flavorful berries that taste far better than store-bought. These compact, runnerless or low-runner plants produce sweet, aromatic fruit from late spring through fall — perfect for fresh eating, smoothies, jams, and desserts. They thrive in small spaces: hanging baskets, window boxes, 5–10 gallon pots, or vertical planters. No big yard or raised beds required!

Ideal for urban home cooks, balcony gardeners, families with kids, and anyone wanting pesticide-free, ultra-fresh strawberries straight from their own space. In Chicago and cooler zones they grow beautifully as productive perennials in containers; in warmer southern states they perform as everbearing annuals with afternoon shade.

Step-by-Step Growing Guide (Seed to First Berries in 60–90 Days)

  1. Seed Prep & Sowing
    Tiny seeds — cold stratify for best results (place seeds in moist paper towel in fridge for 2–4 weeks). Surface sow (do not bury) on moist, sterile seed-starting mix; they need light to germinate. Keep at 65–75°F. Germinates in 14–30 days.
    • Nationwide timing tip: Start indoors 8–10 weeks before last frost. Chicago/Midwest/Northeast: late February–March. South/Southwest: February or direct sow once soil warms. West Coast: almost any mild month.
  2. Planting & Container Setup
    Full sun (6–8+ hours) or light afternoon shade in hot climates. Use well-draining, rich potting mix in 5–10 gallon pots, hanging baskets, or strawberry jars. Space 6–8 inches apart. Excellent drainage prevents crown rot.
  3. Germination & Early Care
    Keep soil evenly moist (mist gently) until sprouts appear. Thin or transplant once true leaves form. Light balanced fertilizer every 3–4 weeks after first true leaves. Protect young seedlings from slugs and birds.
  4. Growth & Maintenance
    Plants form neat mounds (6–12 inches tall) with few or no runners on alpine types. Mulch with straw to keep fruit clean and retain moisture. Consistent watering (never soggy) and occasional feeding keep production high. In Chicago summers they love balconies; in southern heat provide shade cloth during peak afternoon sun.
  5. Harvesting
    Pick fully red, fragrant berries when they easily detach. Harvest every 1–2 days for continuous production. Everbearing varieties keep fruiting until first hard frost. Save a few berries for next year’s seed saving!

Pro Tip for Every State: Grow in hanging baskets or containers for easy mobility — move to shade in heat waves or bring indoors before frost in Chicago. Vertical or stacked planters maximize tiny balconies.

Easy Strawberry Recipes for Home Cooks

  • Fresh Strawberry Balsamic Salad: Sliced berries with greens, goat cheese, and balsamic glaze.
  • Homemade Strawberry Jam or Freezer Jam: No pectin needed with these sweet varieties.
  • Strawberry Shortcake or Smoothies: Classic shortcake or blend with yogurt and banana for a quick breakfast.
  • Patios” rank fast.

Important Note: Strawberry seeds can take patience (slow germination), but the reward is superior flavor and true-to-type plants. Grow in containers everywhere to manage space and soil quality.

🍓🌱

Key Benefits

  • Sweet red berries from seed-grown plants
  • Compact plants – suitable for containers and hanging baskets
  • Cold stratification recommended for best germination
  • First fruit: 4–6 months from germination
  • Perennial – plants produce for 3+ years

How to Grow

  1. Cold stratify: freeze seeds 2–4 weeks before sowing
  2. Sow on surface of moist seed-starting mix; seeds need light
  3. Keep at 60–70°F; germination in 2–6 weeks (variable)
  4. Transplant seedlings when 2–3 inches tall; space 8–12 inches
  5. Plant in full sun with rich, well-draining soil
  6. Pinch first flowers to strengthen plant; allow later blooms to fruit

Specifications

Quantity: Type: Organic strawberry (variety may vary). First fruit: 4–6 months from germination. Spacing: 8–12 inches. Sun: Full sun (6+ hours). Lifespan: Perennial (3+ years). Cold stratification: Recommended.

Care & Storage

Store seeds in refrigerator or freezer for best viability. Strawberry seeds can be challenging—expect variable germination rates. Mulch plants in winter in cold climates.

Strawberry Seeds (Fragaria vesca & everbearing varieties) – Detailed 50-State Sowing Calendar (2026)

Strawberry seeds (especially alpine and everbearing types) are cool-season perennials that need cold stratification (2–4 weeks in the fridge) for reliable germination. They are more cold-tolerant than tropical herbs but hate extreme summer heat. Once established they fruit for years in containers.

Key rules that apply to every state:

  • Cold stratify first: Mix seeds with moist paper towel or vermiculite, seal in a bag, and refrigerate 2–4 weeks before sowing.
  • Surface sow (do not bury) — seeds need light. Germination is slow (14–30 days) at 65–75°F.
  • Start indoors 8–10 weeks before your last spring frost date.
  • Transplant outdoors after last frost when soil temperature is 50°F+ (strawberries tolerate light frost better than most tender crops).
  • In USDA zones 8–11 grow as fall-planted perennials or with afternoon shade.
  • Perfect for containers and hanging baskets nationwide.

Detailed 50-State Sowing Calendar (Grouped by Region for Easy Reading)
Dates are averages based on 50% probability last spring frost and typical 2026 conditions. Adjust ±7–10 days for your exact microclimate or elevation.

Region / States

Indoor Start (after stratification)

Transplant / Direct Sow

Notes / Example Cities

Northeast (ME, NH, VT, MA, RI, CT, NY, PA, NJ)

Late Jan – mid Feb

April 25 – May 20

New York City: Stratify Jan → Indoor early Feb → Transplant mid May

Midwest & Great Lakes (IL, IN, OH, MI, WI, MN, IA, MO, ND, SD, NE, KS)

Late Jan – late Feb

April 20 – May 15

Chicago, IL: Stratify mid Jan → Indoor late Jan–mid Feb → Transplant late April–early May

Mid-Atlantic & Upper South (DE, MD, DC, VA, WV, KY, NC, TN)

Mid Jan – early Feb

April 10 – May 5

Washington DC: Stratify late Jan → Indoor early Feb → Transplant late April

Southeast & Gulf (SC, GA, AL, MS, AR, LA, OK)

Dec – mid Jan

March 20 – April 20

Atlanta: Stratify Dec → Indoor early Jan → Transplant mid April (or fall plant)

Texas

North: Jan

Central/South: Dec–Jan

North: mid April

Central/South: March–early April

Dallas: Indoor early Jan → Transplant mid April

Houston: Fall planting recommended for best results

Florida

North: Nov–Dec

Central/South: Oct–Dec

North: Feb–March

Central/South: Dec–Feb

Miami: Plant in fall (Oct–Dec) for spring crop; treat as short-lived perennial

Southwest (AZ, NM, UT, NV)

Late Dec – early Feb

March 15 – April 25

Phoenix: Fall planting (Oct–Dec) or early spring with shade

Flagstaff: Indoor Feb → Transplant May

Mountain & Northern West (CO, ID, MT, WY)

Late Jan – mid Feb

Late April – late May

Denver: Stratify Jan → Indoor mid Feb → Transplant mid May

Pacific Northwest (WA, OR)

Late Jan – mid Feb

April 25 – May 20

Seattle: Indoor early Feb → Transplant mid May

California

Northern/Coastal: Jan–Feb

Southern/Inland: Dec–Jan

March–May

Los Angeles: Fall planting ideal

San Francisco: Indoor Jan → Transplant March–April

Alaska

Mid Feb – March

Late May – early June

Anchorage: Short season — best in containers with protection

Hawaii

Not needed (mild year-round)

Year-round (best Oct–March)

Honolulu: Plant in cooler months for strongest growth

Pro Tips for Every State

  • Chicago / Midwest / Northeast gardeners: Stratify in January and start indoors under grow lights for strong transplants ready around Mother’s Day. Containers let you move plants indoors during surprise late freezes.
  • Southern & Southwestern gardeners: Fall planting (September–December) often gives better spring crops than spring planting. Provide afternoon shade and consistent moisture in summer.
  • Container / balcony growers: Use 5–10 gallon pots or hanging baskets — perfect for urban spaces and easy to protect from extreme heat or cold.
  • Fall planning: In zones 7–11 you can start a second crop in late summer/fall for next year’s harvest.

🍓🌱

Key Terms

  • Fragaria × ananassa — Botanical name for garden strawberry
  • Cold stratification — Exposing seeds to cold to break dormancy and improve germination
  • Perennial — Plants that live and produce for multiple years

The first strawberry from a plant you grew from seed tastes sweeter than any store-bought berry—because you earned it.

Shipping Notes
  • Free Standard Shipping on $100+ Orders to the USA.
  • Except Preorder products are shipped in 48 hours.
  • Delivery to the USA:
  1. Standard Shipping : 3-10 business days
  • If time is of the essence, please consider selecting expedited delivery for faster service.
Exchange/Return Notes
  • We offer a 30-day return/exchange service after receiving.
  • Final sale items are not eligible for returns or exchanges.
  • To process your return/exchange, please contact us at [email protected]
  • Please click here for more details>>> Return & Exchange Policy
SKU: 44824340418

Discover Niche Categories That Outsell organic strawberry seeds for sale

Top-Converting Item to Boost Your Average Order

4.4 ★★★★★
Based on 708 reviews
Sort
Highest Rating
Newest First
Oldest First
Product Reviews
N
Verified Purchase
Natalie R.
Omaha, US
★★★★★ 5
Looks great, doesn't hold much so measure carefully
Color: Gray, Size: Rectangle
I got this organizer for my husband to keep his stuff by the door. While it's a little smaller than I'd hoped, it looks great in the entryway. It's super easy to snap together, but feels like the material could be damaged easily if you're not careful. He is able to store his keys, wallet, and sunglasses in it, and throws hit hat on top. Overall we are really happy with it.
WAS THIS REVIEW HELPFUL?YesReportShare
Reviewed in the United States on January 31, 2026
R
Verified Purchase
Rin
Battle Creek, US
★★★★★ 5
Perfect
Color: Blue, Size: Square
Just what I needed. The size is perfect as I didn’t want anything too large to place my watches and other accessories inside near the corner of my desk. Its size is essentially 7x7, and the design is sleek compared to other organizer holders. I got the color in blue and it looks stunning with the rest of my setup. I’m unsure about other reviewers, but mine came safely and the leather walls are decently thick, so it’s not too flimsy when buttoned together which holds very securely. There are hole spaces at the bottom corners once assembled, so if you have super small items such as beads or really small jewelry, they could potentially fall out, but most of my items are large enough that won’t be of concern. If you have a wire charger near by, the holes could be used to charge your smartphone inside, which has its own practical usage. Overall, I’d definitely recommend it if you’re on a lookout for a sleek but compact organizer holder, and I personally will consider getting another one in the future for myself for other household belongings.
WAS THIS REVIEW HELPFUL?YesReportShare
Reviewed in the United States on October 13, 2024
C
Verified Purchase
Chee Hoo
Louisville, US
★★★★★ 5
Magical TV Backlight With Amazingly Accurate and Vivid Colors
Size: 7.8FT for 40''-50'' TV, Size: 7.8FT for 40''-50'' TV
I had very high expectations for this Govee 3 Lite backlight and it surpassed all of them by a mile. This Govee 3 Lite with proper set up, calibration and correct settings looks absolutely magnificent with beautiful and accurate colors that it adds so much to my TV viewing experience. Most of the "bad" reviews on here is USER ERROR because the person can't bother to do even the most basic research therefore he/she doesn't know how to set it up, calibrate and adjust settings correctly. So here are some tips and settings that may help others: For accurate colors it's vital to set your white light accurately first since all other colors blend off of white. Also, ALL of your TV SETTINGS like BRIGHTNESS, COLOR TEMPERATURE, PICTURE MODE, COLOR, CONTRAST, etc. has an impact on the LED strip brightness, vividness, accuracy and density as well. So play around and pause a scene on your TV that's really colorful and then turn your individual TV settings all the way up and all the way down to see how it affects your Govee lights. Now I have an LG OLED and OLED's have perfect black levels and near perfect colors out of the box, so you may not get the exact results I did. But it doesn't hurt to give it a try and see if it helps your Govee set up if you are not satisfied with your colors. 1. Put the camera dead center of your TV and at 90 degrees (or as close as you can). 2. Install the light strip as close as you possibly can to the edge of your TV. I've seen youtube videos where people install them 2" to 3" inward from the edge (I get it if you have no choice because your back panel has a weird shape or is not completely flat along the edges) and that gives such a tiny light spread on the wall and also leads to dead spots in the corners because the light is set too far away and that causes the TV's corners to cast a shadow on the wall leaving a dead spot. 3. When you calibrate with the orange squares make sure the gray box ends up looking either like a rectangle or a bow tie. I added pictures of my actual calibrations of both shapes to my review to give you an idea of what I'm talking about. If your TV is wall mounted or on a TV stand where there's nothing underneath the camera that may interfere with it, I'd probably go with a rectangle shape which is the ideal shape according to Govee. But after playing around with the calibration I discovered that for my set up a bow tie shape gives me the most accurate and uniform colors because I have a semi-glossy TV stand and it helps to prevent the camera from seeing past the bottom edge of my TV and catching whatever colors that are reflecting back up off my TV stand so it doesn't interfere with the actual colors coming from my screen. 4. When you adjust the "color calibration, saturation, white balance, etc." in the app do it in a dark room. 4a. "Saturation" setting needs to be dropped way down to give you accurate colors. I keep mine between 1%-5%. If you're one of many people that's having problems with your white light looking green, dropping the saturation down a lot should fix that problem and give you a nice white light that will go a long way in giving you accurate colors across the board. 5. "White balance" default is 50% but it looks a little too blue on my LG OLED so I keep my white balance a little more on the red side at 70%-75% and I get a nice slightly warmer white that works wonders in getting accurate colors all around. Google "pure white" background and use that to adjust your white balance and saturation. 6. "Relative Brightness" default is 50%. I set mine all the way up to 100% on all four sides and then I control the brightness level with the main brightness slider which when it's a bright room I set it to 100% and when it's a dark room I set it to 47% because that's the percentage I found that when the screen or parts of the screen goes dark so do the corresponding lights which only adds to the immersive viewing experience. 7. If you want your lights to show all the different colors as you watch TV you need to choose "part" in the app. If you choose "whole" you will get only solid colors on all four sides. 8. You can choose either "movie" or "game" but personally I leave mine to "movie" 90% of the time even if I'm gaming. The difference between them is with "game" the colors switch a little faster but that leads to a lot more flickering which can be very distracting. With "movie" it's a softer and smoother transition. 9. I love that I can connect my Govee kit to my Alexa app by adding it in the "skills" section which allows me to control the backlight with voice commands for things like turning the LED strip on and off or the brightness up or down or setting a timer/routine to turn the LED strip on or off at a certain time of day I set. Thankfully I had a few weeks to do a lot of research and also check out youtube videos before Prime Day when I was able to purchase this kit for $46 for the 40"-50" size. And it was in doing this research that made my set up super easy with no problems at all when my kit arrived. All told it took me about two hours from start to finish to install and set up my backlight settings to get it perfect for my LG OLED TV. It took me longer than most people since I went all OCD when figuring out the exact placement, spacing, height and measurements of the lights to get the best possible light spread on my wall and it was all worth it since my LED's look fantastic because I have a full and wide light spread and the colors are so evenly dense with no dead spots in the corners like I've seen on so many other set ups. I was worried that the whole calibration thing would be a PITA since a lot of reviewers seem to struggle mightily with getting it right. For me, it was super simple because through my research I learned what not to do and avoided all the pitfalls that plague others. The proof is in the pudding. I've added screenshots of the settings I use and a sample video with those settings and my lights are mesmerizing and gorgeous. Check it out!
WAS THIS REVIEW HELPFUL?YesReportShare
Reviewed in the United States on October 10, 2025
A
Verified Purchase
Anah V.
Dallas, US
★★★★★ 5
Probably the best available for the money
Size: 11.8FT for 55''-65'' TV, Size: 11.8FT for 55''-65'' TV
I love these lights. High-quality dynamic backlighting for your TV. With the calibration and settings dialed correctly, it moves and breathes smoothly with the picture as you use the screen. With this installed it really amps up the cozy and artsy vibes of the screen, adding further immersion. It's also easier on your eyes in a dark room to add backlighting. You can set the brightness level to the level you want, and you can fully control the colors and tone, whether you want to set it to something static, add a colored border, or use the dynamic lighting (which is what I'm currently using). These lights were made for 55 inch to 65 inch TVs. There are four strips rolled up, two for the short side and two for the long side. No matter which corner you start from, you will be able to set it up properly during calibration. The strips stuck well so far but were not so firm that I couldn't pull up one strip to reapply it. The TV I have here in the pictures is the Sony Bravia ii OLED 4K panel (~$2000 screen, excellent picture quality for the price point). I am using a Rocketfish omnidirectional wall mount behind it. TIPS I followed some other reviews here for the calibration. It was recommended to set the TV brightness to max for calibration, then adjust both TV and backlight brightness after setup. The physical setup only required me to have a TV pulled forward from the wall a foot or so, plus a 3-step ladder so I could easily reach the top of the TV. You could absolutely install this on a TV sitting a bit forward on a stand as well. App setup was a breeze once the lights and camera were attached properly. I will sort out my cable management eventually, once I have a TV shelf installed below my panel which is my next goal for this room. The kit comes with some additional adhesive to secure the lights that I didn't end up using, as the adhesive on the back of the light strips was sufficient for now. I'm saving the extra parts just in case. Overall I highly recommend it! The dynamic lighting adds so much immersion without being loud or flashy unless you want it to be. Kinda just blends into the background and subtly amps up the quality of your whole experience. Like the color on the picture just blends seamlessly into the wall and the room.
WAS THIS REVIEW HELPFUL?YesReportShare
Reviewed in the United States on December 19, 2025
P
Verified Purchase
poshi
Fort Morgan, US
★★★★★ 5
Best lights out there
Size: 11.8FT for 55''-65'' TV
absolutely love it makes the colors stand out just so much more makes movies so much more immersing and the sound reaction makes you feel like your almost inside the movie if you have dolby atmos speakers (8d) and the app is so simple and easy all their products including this are just efficient and useful and one of my favorite parts about the app is the upload center you can use other people’s led light settings if they publish it and definitely the video capturing the camera does not have a adhesive by the way but it is definitely stable the led lights adhesive is very good re taped it after the first time because it was a little croooked and the adhesive was still really good i haven’t had any issues in the past 2 ish months the app is very smart the timer works just on point the brightness is amazing if it doesn’t feel like it just wait till the room is pitch black and lastly the apps control is great so simple and effective just not doing too much you know
WAS THIS REVIEW HELPFUL?YesReportShare
Reviewed in the United States on May 30, 2026

recommand products