SKU: 75907436701
polka dot plant indoor or outdoor

polka dot plant indoor or outdoor Polka Dot Plant – Plant Detectives

Sale price$23.31 Regular price$25.90
Save 10%

Pay in installments of $6.47 with ShopPay, AfterPay and Klarna

Shipping Estimate
USA
  • USA
  • CAN

Ships within 48 hours · Estimated delivery Jul 16 - Jul 21

Promo Codes Available:

For Your Every Summer RSVP, with Code: SUMMER15

Description

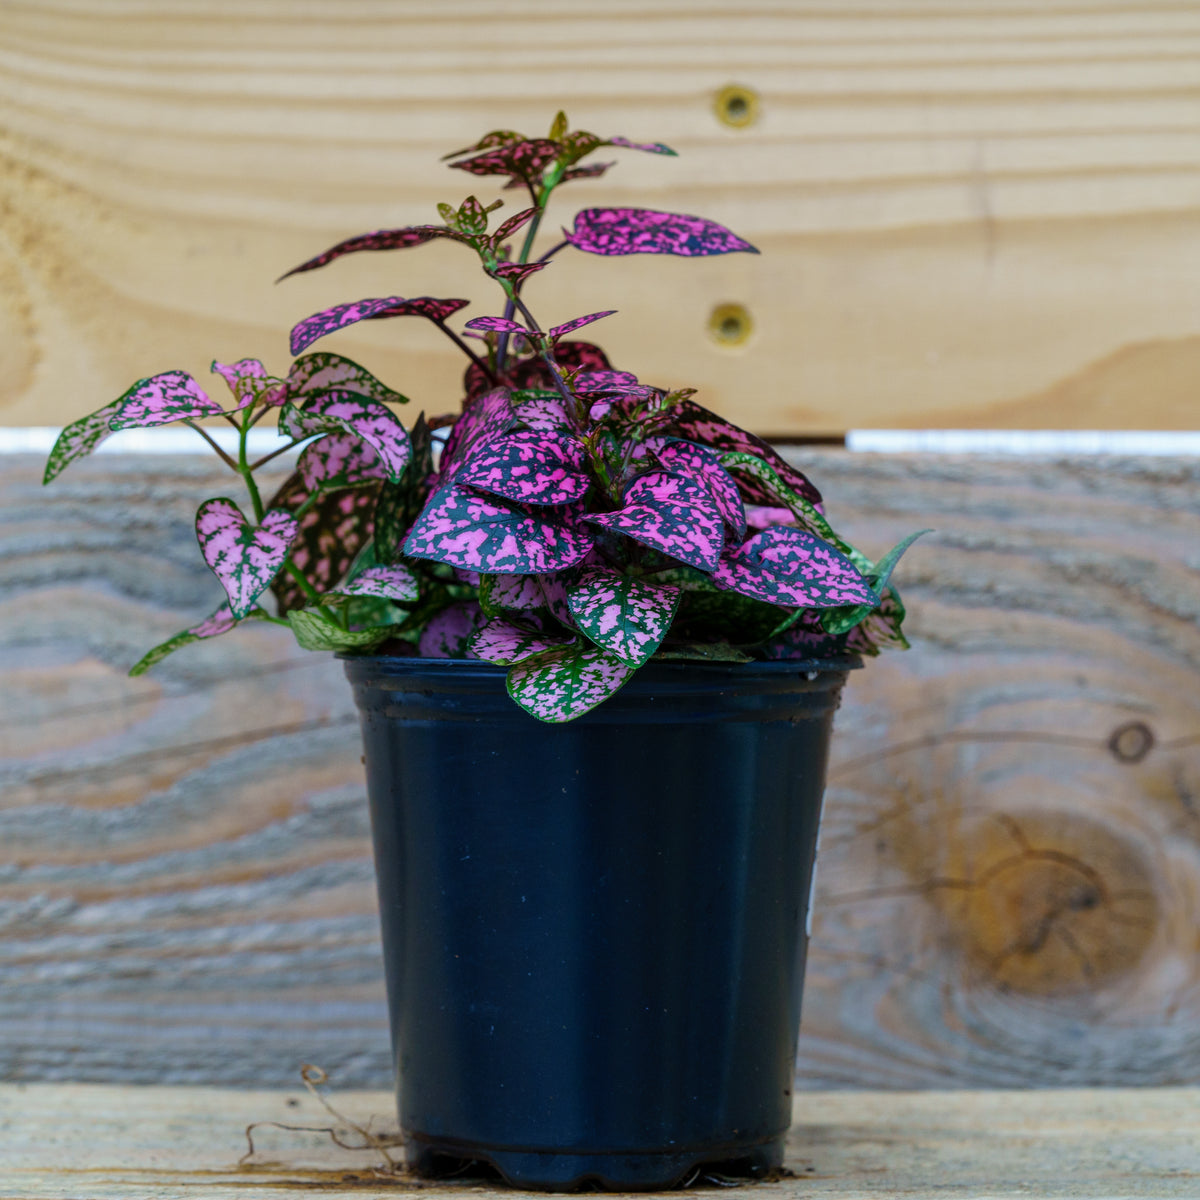
polka dot plant indoor or outdoor Polka Dot Plant – Plant DetectivesPolka Dot Plant (Hypoestes phyllostachya) Polka Dot Plant is a small, colorful foliage plant that instantly brightens indoor spaces with speckled leaves that look hand painted. It stays compact when pinched regularly, making it easy to keep tidy on desks, shelves, and windowsills. In bright, filtered light, the leaf color stays stronger and the plant fills in faster. If you want a fast, cheerful pop of pattern without a complicated routine, this is a

Polka Dot Plant (Hypoestes phyllostachya)

Polka Dot Plant is a small, colorful foliage plant that instantly brightens indoor spaces with speckled leaves that look hand-painted. It stays compact when pinched regularly, making it easy to keep tidy on desks, shelves, and windowsills. In bright, filtered light, the leaf color stays stronger and the plant fills in faster. If you want a fast, cheerful pop of pattern without a complicated routine, this is a dependable choice.

Distinctive Features

This plant is grown for its mottled foliage, most often green leaves splashed with pink, but also found with red or white patterning depending on the selection. It naturally wants to stretch if light is too low, so regular pinching helps maintain a bushy, full shape. Small purple flowers can appear in summer to fall, and many growers remove the flower spikes to keep the plant focused on foliage and compact growth.

Growing Conditions

  • Sun: Bright, indirect light or bright filtered light, with some gentle morning sun tolerated.
  • Soil: Rich, well-drained potting mix that holds even moisture, in a container with drainage holes.
  • Water: Keep soil evenly moist, watering when the top 1 inch begins to dry, and avoid soggy conditions.
  • Humidity: Moderate to high humidity supports cleaner leaf edges and steadier growth.
  • Zones: USDA Zones 10 to 11 outdoors, typically grown as a houseplant elsewhere.
  • Mature Size: About 12 to 24 inches tall and 12 to 24 inches wide.

Ideal Uses

  • Focal Point: Use Polka Dot Plant as a focal point in a small pot where the speckled foliage can carry the whole display.
  • Desk and Shelf Color: Place in bright indoor spots to add pattern and freshness without taking up much space.
  • Mixed Indoor Containers: Combine with solid green foliage plants to create contrast and a more designed look.
  • Bright Bathrooms: Grow in a bright bathroom where humidity helps keep leaves looking their best.
  • Seasonal Outdoor Accent: Use as a warm-season container accent outdoors in bright shade, then bring indoors before cold weather.

Low Maintenance Care

  • Pinching: Pinch tips regularly to encourage branching and prevent leggy growth.
  • Flower Spikes: Remove flower spikes if you want the plant to stay compact and foliage-forward.
  • Watering: Do not let the pot dry out completely, and do not keep it constantly wet.
  • Light: Increase light if color fades or stems stretch, and avoid harsh sun that can scorch leaves.
  • Feeding: Feed lightly during active growth with a balanced houseplant fertilizer to support full foliage.

Why Choose Polka Dot Plant?

  • Instant Pattern: Speckled leaves add color and personality without relying on flowers.
  • Compact Potential: Easy pinching keeps the plant dense, tidy, and well-shaped.
  • Fast Results: Fills in quickly in bright, filtered light and steady moisture.
  • Small Space Friendly: Perfect for windowsills, desks, and shelves where you want impact in a small footprint.
  • Easy to Refresh: Simple trimming and consistent care keep it looking vibrant and full.

Polka Dot Plant performs best when you give it bright, indirect light, even moisture, and a little humidity support. Keep up with pinching and it stays bushy and colorful instead of stretching. Used on its own or mixed with other houseplants, it adds an easy, upbeat look that makes indoor spaces feel more alive.

Shipping Notes
  • Free Standard Shipping on $100+ Orders to the USA.
  • Except Preorder products are shipped in 48 hours.
  • Delivery to the USA:
  1. Standard Shipping : 3-10 business days
  • If time is of the essence, please consider selecting expedited delivery for faster service.
Exchange/Return Notes
  • We offer a 30-day return/exchange service after receiving.
  • Final sale items are not eligible for returns or exchanges.
  • To process your return/exchange, please contact us at [email protected]
  • Please click here for more details>>> Return & Exchange Policy
SKU: 75907436701

Discover Niche Categories That Outsell polka dot plant indoor or outdoor

Top-Converting Item to Boost Your Average Order

4.7 ★★★★★
Based on 24 reviews
Sort
Highest Rating
Newest First
Oldest First
Product Reviews
A
Verified Purchase
Amy Biggs
Belleville, US
★★★★★ 5
40 Years Young and Ready to Bring My RV Back to Life!
As a happy 40-year-old guy who takes a lot of pride in his RV, I’ve been on a mission to remove all the oxidation and restore that clean, glossy finish. After doing my homework, I decided to try Poli Glow Boat & RV Restoration, and I couldn’t be more excited about the results so far. I honestly can’t wait to see what it looks like once I’m completely finished. The quality of this product really stands out. It doesn’t feel like some quick temporary fix — it’s clearly made to properly restore fiberglass surfaces. The application use is straightforward, especially if you follow the prep steps carefully. Once I got into the rhythm of it, the process felt manageable and even kind of satisfying. What impressed me most was the smoothness it brought back to the surface. Areas that were dull and chalky from oxidation are starting to look deep and refreshed again. It’s doing a solid job with light scratch removal too, especially the small surface marks that naturally build up over time. I also appreciate the added layer of durability it promises. After putting in the work, I want something that’s going to last and protect the finish moving forward. And for anyone dealing with minor staining or corrosion spots, it definitely helps improve the overall look, contributing to better rust removal results around metal fixtures and trim. If you’re like me and want your RV looking proud and road-ready again, this feels like a serious step in the right direction. I’m genuinely excited to see the full transformation once I finish the entire exterior. Definitely worth the effort.
WAS THIS REVIEW HELPFUL?YesReportShare
Reviewed in the United States on February 19, 2026
A
Verified Purchase
Amazon Customer
Belleville, US
★★★★★ 5
Great product, great support, looks better than new!
I couldn't possibly be more pleased with how my RV looks after Poli-Glow! I have a 2018 Rockwood 21' RV trailer that had not been treated before, so there was oxidation / fading from being in the Arizona sun - it just looked dull (the color is mostly beige). I am not usually a DIY'er. I researched options online and really appreciated the educational videos on Poli-Glow so I went with that. I don't have buffer machine or anything like that so I liked the idea of being able to do everything by hand. (Even if I had a buffing machine, I think that would have been more tiring having to climb a ladder with it and holding it over my head while applying a traditional wax - plus having to change between it and buffing cloths before wax would dry). Plus I like that this is a longer lasting treatment than a traditional wax. You will need some time - I spread my project over 4 days (day 1 - cleaning the RV and separate UV protection of the roof and awning; day 2 - Poli-Prep the whole RV; day 3 and day 4 Poli-Glow half the RV day 3 and finish day 4). Doing the Poli-Prep was easy. I mixed it in a spray bottle. I hosed down the section of the RV I was getting ready to scrub, sprayed on the Poli-Prep, scrubbed the area with the scrub brush that came with the kit, then hosed the area down and let it air dry. I only used about a third of the bottle of Poli-Prep. After the Poli-Prep the RV looked better than it did before, but that's not where the real shine comes from. I appled Poli-Glow to the RV surface, over the decals, plus all the black trim areas. The coats dried quickly so I didn't have any extra downtime between coats. When I finished a coat I walked about 30 feet to my working station in the shade, added more Poli-Glow to the mitt, and by the time I got back to the RV the previous coat was dry and ready for the next coat. Overall I worked a side of the RV from left to right; within a section I started on the bottom section up to almost as high as I could reach and used a ladder for the top half. The first coat get absorbed pretty thoroughly so the area looks only partially polished; by the 2nd - 3rd coat the shine really starts to show. Since I am in AZ, I applied the recommended 10 coats of Poli-Glow (10 coats to about a 5 to 6 foot section, then move the ladder to the next section). Overall I used 2 bottles of Poli-Glow with about a half inch left in the bottle. I did time my efforts both days to work on sections that weren't in the direct sun, making sure the area I would work on was cool or warm, not hot. Support was SUPER-FANTASTIC! I sent questions via Amazon contact seller and received very fast responses. They also sent me an email link to other videos from a detailer, so by the time I started I was confident and ready. During the project I sent pictures and they provided fast feedback that I was in fact progressing very well - very encouraging and confidence boosting. Thank you Sean! So yes, it took some time, but it was so worth it! It is shiny and beautiful and looks like new (actually better than new)! My neighbor has already asked me about it so he can do his RV. After I was done I took my victory lap - I sat in my driveway staring at it while sipping a beer, basking in the reflection of the sunset mirroring off the RV!
WAS THIS REVIEW HELPFUL?YesReportShare
Reviewed in the United States on March 13, 2026
C
Verified Purchase
Cindy
Battle Creek, US
★★★★★ 5
Oxidized fiberglass RV looks new again!
WOW! I researched high and low for a product that would bring back the shine to our 10 year old travel trailer that has fiberglass panel siding. There were countless videos watched, numerous products tried without success and then I discovered PoliGlow Restoration Fiberglass Kit for boats and RVs. It came with the cleaner and pad to remove the oxidation and a bottle of Superior Fiberglass Restoration, Protection and Shine. This product is amazing. The condition on the exterior of our RV had become a bit embarrassing, but now it shines with the newest of them. The instructions are easy to follow, there are even videos of the process! It does require several coats of the Restoration and Shine product. The cost is extremely reasonable for the end result of the RV. The shine is amazing! Highly recommend this product. PS It was extremely easy to apply as I had my husband do it, he didn’t complain at all and was thrilled with the result!
WAS THIS REVIEW HELPFUL?YesReportShare
Reviewed in the United States on July 24, 2025
C
Verified Purchase
CV S.
Lowell, US
★★★★★ 5
Wow this stuff works!!
Wow. What an amazing product. I own a 1976 Bertram 42 aft cabin motor yacht. The previous owner had not waxed it in a good long time. I spent a weekend with four friends sweating and laboring using the traditional wet sanding, buffing, and waxing it's heavily oxidized finish. One of the friends helping was a former professional boat detailer. The results were ok. The wax job lasted about six months before it looked like crap. There's a lot of controversy over Poli Glow. A number of the old fellows who sit around drinking coffee in the marina clubhouse swear that nothing should go on a boat except the most expensive and laborious traditional wax, preferably applied by a crew of of professionals. They universally ranted about the failings of Poli Glow despite having no practical experience. They also talk more than they actually boat, so I didn't listen to them. I was cautious, and started with my heavily oxidized flybridge. I wanted to work my way top to bottom and I figured if I hated the look, I could stop and it wouldn't really noticeable. It was easy to use. I bought the complete kit. Mixed the prep. Sprayed and scrubbed. Wow that stuff gets things clean and even. I wiped the Poli Glow on with the provided mitt. Tip: really, you needs to let each coat dry before applying the next. It was noticeable alright. From the dock you can now see an actual reflection of my antennae in the now shiny Fiberglas. It's amazing. I did find that the more oxidized portions were thirsty as heck and took a lot of coats. The results are worth it. Application is way less laborious than buffing and waxing. If you can wipe clean a countertop in your kitchen or galley you can Poli Glow like a pro. It's that stupidly easy. Where the gel coat was reasonably smooth the product built a mirror finish. I didn't even put her on the hard. I applied it while it was docked. I couldn't have five that with a buffer. My pro detailer friend was totally surprised at the result. Bottom line: if you have an older sad looking boat this stuff can make it shiny and happy with minimal labor. Good stuff well worth the price.
WAS THIS REVIEW HELPFUL?YesReportShare
Reviewed in the United States on June 29, 2017
P
Verified Purchase
pdb
Alexandria, US
★★★★★ 4
Overall great product, especially on solid colours.
I bought a 33 year old boat that is mostly white gelcoat. Some of the white had yellowed in areas and there were bright spots where I removed stickers and hull numbers. The boat also has red and blue metal flake that was quite faded and gritty. The flake is large particles of metal or paint or whatever, not fine little glitter bits like they do now. I called Poli Glow Canada and the guy told me to use 600 grit wet sandpaper to smooth out the metal flake and then wash with the Poli Prep. The white came up pretty clean, but I had to use the sandpaper on some areas to take off the yellow. The Poli Glow went on really easily and quickly. When you are doing it, keep an eye on the the edges of the applicator. If the liquid starts to harden, wash the edges in warm water to get them soft again. I didn't do this and have some small bumps kind of like fuzz off a paint roller, which I guess is bits of dried liquid that came off the applicator. You will also get streaks if the edges are dry, but the next coat fixes that right away. Check after each coat to ensure it is smooth. I'm pretty sure a quick pass with the sandpaper would have removed the bumps, but by the time I was finished, I didn't want to mess with it. In the end, the white turned out looking great. The flake is definitely better than when I bought it, but it only shines at about 50% of original (compared to the flake on the transom which was in really good condition) and I was expecting better based on the before and after shots on their site. There are also some streaks in the flake from certain angles where I guess my sanding pressure wasn't consistent.
WAS THIS REVIEW HELPFUL?YesReportShare
Reviewed in the United States on November 26, 2013

recommand products