Pay in installments of $6.91 with
 ,
,
 and
and

Shipping Estimate
USA
- USA
- CAN
- USA
- CAN
Ships within 48 hours · Estimated delivery Oct 11 - Oct 16
 Promo Codes Available:
For Your Every Summer RSVP, with Code: SUMMER15
Description
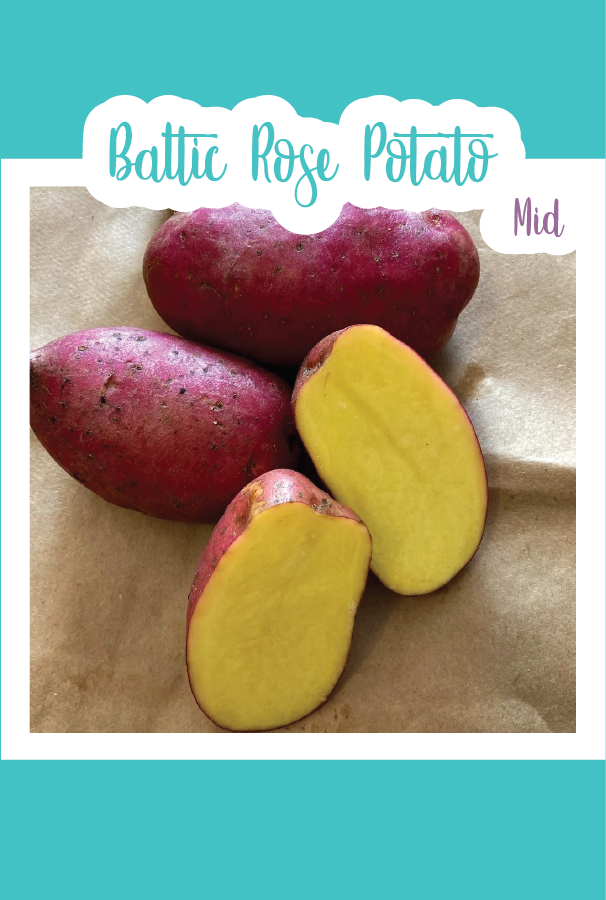
mountain rose potato seed Organic Baltic Rose Seed Potato (Mid)**I will not be selling Seed Potatoes this year.** 1 Organic Seed Potato Maturity: Mid Season Tuber Size: Medium Large Great For: Frying, baking, salads, and roasting Tuber Yield: Heavy Tuber Late Blight Tolerance: Medium Scab Resistance: Moderate Growing Difficulty: Easy Description: The Baltic Rose potato is a very attractive variety, with rosy red skin, and yummy deep, golden yellow flesh. This buttery potato is great for expanding those culinary
**I will not be selling Seed Potatoes this year.**
1 Organic Seed Potato
Maturity: Mid Season
Tuber Size: Medium-Large
Great For: Frying, baking, salads, and roasting
Tuber Yield: Heavy
Tuber Late Blight Tolerance: Medium
Scab Resistance: Moderate
Growing Difficulty: Easy
Description: The Baltic Rose potato is a very attractive variety, with rosy red skin, and yummy deep, golden yellow flesh. This buttery potato is great for expanding those culinary wings. Its silky smooth texture, and rich flavor is especially great for frying, but tastes great roasted or baked too. The plant for this potato is medium to large, and boast cute white flowers. The Baltic Rose is a very reliable, high yielding producer. It has decent drought tolerance, and also shows pretty good resistance to potato leafhoppers and golden nematodes!
Extra Info: Seed potatoes vary in size, however, 1 seed potato, under the right growing conditions, can yield around 1-2 lbs. of potatoes. Seed potatoes are potatoes that are disease free spuds that are not sprayed with growth inhibitors like grocery store potatoes. These are not actual seeds.
****Limited stock, and offered on a first come first serve basis. If we run out of a variety that you pre-ordered, then we will contact you. If we have a substitution then we will offer it to you, if we do not, we will give you a refund. You can choose to not accept the substitution, and receive a refund as well.****
How To Grow Your Own Potatoes
Upon Arrival and Before Planting: When you receive your potatoes, remove your tubers from their packaging (the packaging could potentially trap future or current sprouts). Most tubers will come pre-sprouted, for easy planting. If it'll be more than two weeks before you can plant your taters, store them in a dark place around 65-70 degrees. Keep your tubers from freezing temperatures, or extremely hot temperatures, which can cause water loss and shriveling. The soil needs to reach at least 50 degrees before planting. If it is still too cold in your area, store them, until it's about 4 weeks before planting time. About 4 weeks before you are ready to plant your spuds, check if your tubers have sprouted. If sprouts are already visible, place the uncut potatoes in the light, in something like an egg carton or shallow box, so they can turn green. This method will keep your sprouts green and stocky, and prime for planting in the garden. This method is called green sprouting. It improves germination, and can reduce 10-14 days of growing time meaning an earlier harvest! If your sprouts are not yet present, and you are pressed for time, you can place spuds in a paper bag with apples, bananas, or onions, and it'll induce sprouting. Once your chits, or sprouts, are about 1/2 - 1 1/2 inches long they are ready to plant in the garden! You can plant potatoes whole, if they are small potatoes, however I usually like to cut mine into pieces, making sure that I have at least 2 eyes per piece. I spread those pieces around, in order to have more potato plants and bigger harvests. If you do cut your potatoes, allow the surface to callus over for a couple days before planting. You can also dust the cut pieces with dolomitic agricultural lime or sulfur, if you want to plant them immediately after cutting them. Neither of the two steps are necessary, but they do help to reduce rot, since the seed potatoes are untreated.
Sowing: Avoid planting potatoes in soil that is still cold and wet. The soil should never be below 50 degrees when you plant your tubers. It is always best to wait until the last risk of hard frost has passed, if you're in a cold weather zone. Central-North Florida growers (zones 8-9) should plant their potatoes from January-March, and South Florida growers (zone 10) from September-January. Potatoes prefer cooler soils from 50-75 degrees, similar to tomatoes. Temperatures over 75 degrees will slow the tuber growth, and when temperatures reach around 85 degrees, tuber growth stops. Once temperatures go over 90 degrees the heat will most likely kill your plants. This is why it is important to get your potatoes in the ground early, since they need about 100-120 days of the right temperatures to reach full maturity. Potatoes should be grown in loose soil. Sandy soils tend to work best. If your soil is clay heavy, you should lighten it with compost, in order for the tubers to develop freely. Space your seeds pieces, or whole potatoes, around 12 inches apart. Varieties with heavy tuber set should be spaced about 15-18 inches apart to allow the tubers to mature to full size. Plant your potatoes about 1 inch deep, if you live in a cooler zone, and about 3 inches deep in hotter zones (this ensures that they spuds stay cool). I like to add a layer of hay on top of the soil to keep my potatoes cool, conserve moisture, keep weeds at a minimum, and for added nutrients as the hay breaks down. You can grow potatoes in the ground or in containers. I prefer to grow mine in containers, because it is easier to control their water and nutrient intake. I plant mine in cloth bags no smaller than 10 gallons and use the mound up/hilling method. For heavy set tubers, like russets, I use 25 gallon bags so they have the space they need to get full sized spuds.
Growing: Your potatoes can take about 3 weeks to burst through. Once your plants reach about 4-6 inches tall, I begin what is called the hilling method. I hill by adding more dirt and then a layer of hay (not required, just something I like to add since South Florida is hot), leaving about 1-2 inches of the plant still exposed. I do this, alternating between dirt and hay, until I reach the top of the container its in. If you're planting in the ground you can do this until you've created a good mound around your plants. Hilling is beneficial for several reasons. Hilling covers the developing tubers and prevents them from becoming green, inedible, and bitter. It also allows for more levels of roots where more tubers can develop, increasing your yields, and maximizes your space. Potatoes are heavy feeders, so you should start your plants off with a good composting. I also like to feed my plants about 5-6 times during their growth with liquid seaweed/kelp and fish emulsion. You can feed them through watering the soil, or by spraying the leaves. I do a mixture of both. You could also consider feeding them with compost tea and other foliar nutrients, depending on your preferences. Potatoes need consistent watering, once their flowers start to bloom. This means tubers are forming, and they will need extra moisture to sustain them. Potatoes are pretty easy growing plants and will practically grow themselves. Even when I neglect them, and forget to water and feed them, I'll still get great harvests. However, pests and diseases can be an issue. It is important to rotate your crops, and not plant potatoes where other nightshades have grown in the last 3-4 years, since they share common pests and diseases. The Colorado Potato Beetle, can be your biggest enemy. The easiest way to control them is to check the underside of the potato leaves for orange egg masses. Once they become adults, they are a nuisance to get rid of.
Harvesting: Potatoes can be eaten at any time once they start to develop. You'll know spuds are developing once the plant flowers. You do not have to pull the entire plant yet. You can harvest new potatoes, by gently moving the soil away from the roots, and remove the tubers that have come to size, while leaving the smaller ones to further develop. Just make sure to cover the remaining potatoes with dirt to protect them. If you wish to store your potatoes, wait at least 2 weeks after the vines have died back, and the potato skins have thickened. You can store your potatoes in bins, or burlap sacks, and you should store them in a dark, moist place. You can also save some of your potatoes to plant the following year, since this is the easiest way to grow potatoes.
True Potato Seeds: Did you know that potato plants make actual seeds? In fact, some varieties, such as the yukon gold, are known for producing seed. However, most varieties' flowers will dry up and drop without producing seed pods. The seed pods look like small, green, cherry tomatoes. While they look like tomatoes, they should never be eaten due to their toxicity. However, it is important to know that the seeds you save from a potato plant will not make an exact clone of the mother plant. They have different characteristics from the mother plant and will make completely different varieties. There are currently over 4,000 varieties of potatoes, so the possibilities are endless. It can be a fun experiment to see what surprise varieties you get. Save the seeds like you would those of tomatoes (You can find how, if you haven't done it before, under any of my tomato grow guides). Growing potatoes from their true seeds will take significantly longer to grow, so you should start your plants, indoors, during the winter to give yourself a head start.
Shipping Notes
- Free Standard Shipping on $100+ Orders to the USA.
- Except Preorder products are shipped in 48 hours.
- Delivery to the USA:
- Standard Shipping : 3-10 business days
- If time is of the essence, please consider selecting expedited delivery for faster service.
Exchange/Return Notes
- We offer a 30-day return/exchange service after receiving.
- Final sale items are not eligible for returns or exchanges.
- To process your return/exchange, please contact us at [email protected]
- Please click here for more details>>> Return & Exchange Policy